You're reading the documentation for a version of ROS 2 that has reached its EOL (end-of-life), and is no longer officially supported. If you want up-to-date information, please have a look at Iron.
Windows (binary)
This page explains how to install ROS 2 on Windows from a pre-built binary package.
Note
The pre-built binary does not include all ROS 2 packages. All packages in the ROS base variant are included, and only a subset of packages in the ROS desktop variant are included. The exact list of packages are described by the repositories listed in this ros2.repos file.
System requirements
Only Windows 10 is supported.
Installing prerequisites
Install Chocolatey
Chocolatey is a package manager for Windows, install it by following their installation instructions:
You’ll use Chocolatey to install some other developer tools.
Install Python
Open a Command Prompt and type the following to install Python via Chocolatey:
choco install -y python --version 3.8.3
ROS 2 expects the python installation to be available in directory C:\python38.
Double check that it is installed there.
Install Visual C++ Redistributables
Open a Command Prompt and type the following to install them via Chocolatey:
choco install -y vcredist2013 vcredist140
Install OpenSSL
Download the Win64 OpenSSL v1.1.1n OpenSSL installer from this page. Scroll to the bottom of the page and download Win64 OpenSSL v1.1.1n. Don’t download the Win32 or Light versions, or the v3.X.Y installers.
Run the installer with default parameters, as the following commands assume you used the default installation directory.
This command sets an environment variable that persists over sessions:
setx /m OPENSSL_CONF "C:\Program Files\OpenSSL-Win64\bin\openssl.cfg"
You will also need to append the OpenSSL-Win64 bin folder to your PATH. You can do this by clicking the Windows icon, typing “Environment Variables”, then clicking on “Edit the system environment variables”. In the resulting dialog, click “Environment Variables”, then click “Path” on the bottom pane, finally click “Edit” and add the path below.
C:\Program Files\OpenSSL-Win64\bin\
Install Visual Studio
Install Visual Studio 2019.
If you already have a paid version of Visual Studio 2019 (Professional, Enterprise), skip this step.
Microsoft provides a free of charge version of Visual Studio 2019, named Community, which can be used to build applications that use ROS 2. You can download the installer directly through this link.
Make sure that the Visual C++ features are installed.
An easy way to make sure they’re installed is to select the Desktop development with C++ workflow during the install.

Make sure that no C++ CMake tools are installed by unselecting them in the list of components to be installed.
Install additional DDS implementations (optional)
If you would like to use another DDS or RTPS vendor besides the default, eProsima’s Fast RTPS, you can find instructions here.
Install OpenCV
Some of the examples require OpenCV to be installed.
You can download a precompiled version of OpenCV 3.4.6 from https://github.com/ros2/ros2/releases/download/opencv-archives/opencv-3.4.6-vc16.VS2019.zip .
Assuming you unpacked it to C:\opencv, type the following on a Command Prompt (requires Admin privileges):
setx /m OpenCV_DIR C:\opencv
Since you are using a precompiled ROS version, we have to tell it where to find the OpenCV libraries.
You have to extend the PATH variable to C:\opencv\x64\vc16\bin.
Install dependencies
There are a few dependencies not available in the Chocolatey package database. In order to ease the manual installation process, we provide the necessary Chocolatey packages.
As some chocolatey packages rely on it, we start by installing CMake
choco install -y cmake
You will need to append the CMake bin folder C:\Program Files\CMake\bin to your PATH.
Please download these packages from this GitHub repository.
asio.1.12.1.nupkg
bullet.2.89.0.nupkg
cunit.2.1.3.nupkg
eigen-3.3.4.nupkg
tinyxml-usestl.2.6.2.nupkg
tinyxml2.6.0.0.nupkg
log4cxx.0.10.0.nupkg
Once these packages are downloaded, open an administrative shell and execute the following command:
choco install -y -s <PATH\TO\DOWNLOADS> asio cunit eigen tinyxml-usestl tinyxml2 log4cxx bullet
Please replace <PATH\TO\DOWNLOADS> with the folder you downloaded the packages to.
You must also install some python dependencies for command-line tools:
python -m pip install -U catkin_pkg cryptography empy ifcfg lark-parser lxml netifaces numpy opencv-python pyparsing pyyaml setuptools rosdistro
RQt dependencies
python -m pip install -U pydot PyQt5
To run rqt_graph, you’ll need Graphviz.
choco install graphviz
You will need to append the Graphviz bin folder C:\Program Files\Graphviz\bin to your PATH, by navigating to “Edit the system environment variables” as described above.
Downloading ROS 2
Go to the releases page: https://github.com/ros2/ros2/releases
Download the latest package for Windows, e.g.,
ros2-foxy-*-windows-AMD64.zip.
Note
There may be more than one binary download option which might cause the file name to differ.
Note
To install debug libraries for ROS 2, see Extra Stuff for Debug.
Then continue on with downloading ros2-foxy-*-windows-debug-AMD64.zip.
Unpack the zip file somewhere (we’ll assume
C:\dev\ros2_foxy).
Environment setup
Start a command shell and source the ROS 2 setup file to set up the workspace:
call C:\dev\ros2_foxy\local_setup.bat
It is normal that the previous command, if nothing else went wrong, outputs “The system cannot find the path specified.” exactly once.
Try some examples
In a command shell, set up the ROS 2 environment as described above and then run a C++ talker:
ros2 run demo_nodes_cpp talker
Start another command shell and run a Python listener:
ros2 run demo_nodes_py listener
You should see the talker saying that it’s Publishing messages and the listener saying I heard those messages.
This verifies both the C++ and Python APIs are working properly.
Hooray!
Next steps after installing
Continue with the tutorials and demos to configure your environment, create your own workspace and packages, and learn ROS 2 core concepts.
Additional RMW implementations (optional)
The default middleware that ROS 2 uses is Fast-RTPS, but the middleware (RMW) can be replaced at runtime.
See the guide on how to work with multiple RMWs.
Troubleshooting
Troubleshooting techniques can be found here.
Uninstall
If you installed your workspace with colcon as instructed above, “uninstalling” could be just a matter of opening a new terminal and not sourcing the workspace’s
setupfile. This way, your environment will behave as though there is no Foxy install on your system.If you’re also trying to free up space, you can delete the entire workspace directory with:
rmdir /s /q \ros2_foxy
Extra Stuff for Debug
To download the ROS 2 debug libraries you’ll need to download ros2-foxy-*-windows-debug-AMD64.zip.
Please note that debug libraries require some more additional configuration/setup to work as given below.
Python installation may require modification to enable debugging symbols and debug binaries:
Search in windows Search Bar and open Apps and Features.
Search for the installed Python version.
Click Modify.

Click Next to go to Advanced Options.

Make sure Download debugging symbols and Download debug binaries are checked.
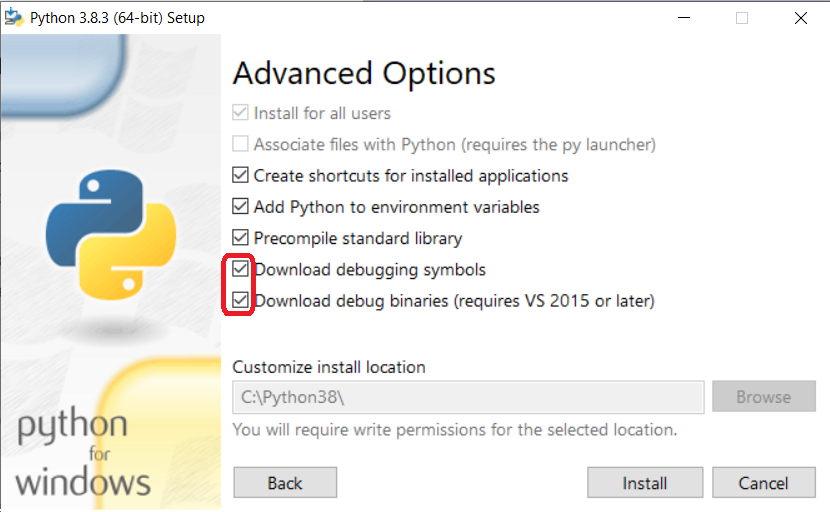
Click Install.
(Alternative) ROS 2 Build Installation from aka.ms/ros
https://aka.ms/ros project hosts ROS 2 builds against the release snapshots. You can find the up-to-date instructions here.